Up until as recently as the late eighteenth century, lighting
technology advanced very slowly since the time when man first
learned to control fire for heating, cooking, and illumination.
During the 1780’s, a Frenchman, Ami Argand, made a startling
discovery. He found that by using a circular, hollow wick rather
than the conventional solid wick, the flame would burn much brighter
because the surface area of the wick was greatly increased (air
for combustion was drawn up through the center of the wick as
well as over the outer surface). Lamps employing this latest
technology were so successful that they sold by the thousands
in Europe, England, and the United States. It did not take long
for others to copy and slightly modify Argands’ lamps. One
modification, the sinumbra lamp, was developed in France around
1820. These lamps used the standard Argand burner and were primarily
designed to reduce the shadow that was typically cast by the
font of earlier Argand lamps. Both lamps burned high-grade oils
such as sperm whale oil or colza oil. Another very popular modification
that was developed around 1836 was commonly known as a solar
lamp. These lamps utilized the typical Argand central draft burner
with the addition of a deflector cap. This resulted in a brighter
flame and the lamp's ability to burn lard and lower grades of
whale oil.
All of the lamps shown in this gallery are made from brass,
bronze, and tinplate. The various brass and bronze parts are
machined, cast, and spun using molds and chucks that have been
made and copied from parts of old lamps. Lamps are electrified
using both halogen and standard incandescent bulbs; halogen bulbs
are generally used on lamps that have a chimney but no shade.
It is important to note that careful attention is given to the
actual physical placement of the bulb making it virtually impossible
to distinguish electrified lamps from oil-burning lamps. Bulb
wattage can be matched to the intended use of the lamp and this
versatility makes these lamps perfectly suited to be used to
illuminate living areas in homes and display areas in museums.
Some of the chandeliers and other lamps have a small on-off/dimmer
switch discreetly mounted inside the lamp. This innovative design
makes it possible to operate the lamp in situations where a remote
switch would be inconvenient to use or very difficult to install.
Lamps have finishes that are appropriate for each individual
lamp's design and style. Paint colors currently available are
opaque Prussian blue, Hunter green, red, mustard yellow, and
black. Striping is done in red, black, and yellow. Stenciled
designs are available on the Argand Side Lamp; lamps made using
brass are now available with a period acid-blackened and lacquered
finish - period gold finishes will be available soon.
A program has been implemented that will make mock-up models
of the various chandeliers, sconces, and table lamps available
to those of you who are interested in purchasing a lamp but are
uncertain if its size and level of illumination will be appropriate
for your particular situation. Models of the Argand 4-burner
Chandelier and Argand Side Lamp are currently available through
this program. Please inquire regarding details and availability.
As always, your comments, questions, and orders are most
welcome.

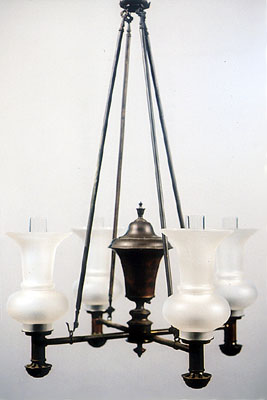
Members of a Philadelphia area historical society recently
purchased a new reproduction Argand three-burner chandelier for
a house that they were restoring. The chandelier’s painted
finish looked new – as it would have appeared if it had
been purchased new in the 1840s. Some of the members thought
that the finish was fine while others felt that a worn or used
look would have been more appropriate.
Who was right? Can we say with any degree of certainty?
I think that it is important for both societies and individuals
to develop a grand plan before starting work on a restoration
project. What is the time period to which the property is being
restored? Would the house and furnishings have been relatively
new? What level of care might the house and furnishings have
received from their owners at the time? I think that only after
you have addressed these questions as well as some less tangible
factors that are explored below to the best of your ability,
will you be able to come to a conclusion as to who might be right.
In the case of the chandelier, consider that fixtures of
this type were quite expensive in the early nineteenth century
and that generally only affluent people or well endowed institutions
could afford them. There is little doubt that a decision to make
a purchase of such magnitude would have been given careful consideration.
The chandelier would not only produce more light than any previous
lighting fixture, but it would also serve as a reminder to those
who saw it that the owner enjoyed an elevated station in society.
I do not think that people today are so very different
from people of the 1800s and that we share many of the same emotions,
likes, and dislikes. In this day and age, we travel by car or
plane while in the 1800s travel was by foot, horseback, or carriage.
Generally speaking, when someone purchases a new automobile,
he or she tends to give it a high level of care – regular
washing and waxing, and servicing of the motor. He or she is
proud of the purchase and strives to keep it in tip-top shape
- not only for their own personal satisfaction, but also perhaps
because it makes a statement to others about their persona. Why
would we expect our forbearers to behave any differently? I am
sure that many kept their horses, harnesses, and carriages in
excellent condition – the evenly matched and spirited horses
looking sleek and trim, the harness leather supple with brass
fittings highly polished, and the carriage immaculate and shining
like a drill sergeant’s boots. Along this same vein, consider
that today people keep their sterling silver highly polished
and prominently displayed. In yesteryear they would surely have
done the same. Even people of lesser means hired women who traveled
from house to house to polish the owner’s tinware, commonly
referred to as “poor man’s silver.”
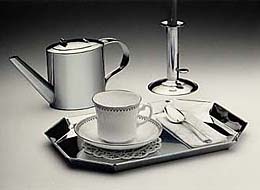
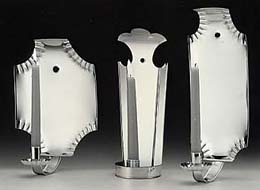
Tinware on a store shelf in the 1800's had a bright,
shiny finish as shown in these two photographs. The highly reflective
backs of the sconces would have served to increase the level of
illumination given off by the candles.
|
|
|
Would we expect a chandelier to be cared for in any other
way? It would not have been hung and then forgotten, for regular
use would have required daily servicing. Wicks needed trimming
and changing, the fuel reservoir replenishing, and the chimneys
and shades cleaning - all on a regular basis. It is hard to imagine
that the chandelier itself would not have been carefully wiped
down as well.
If a historical society seeks to restore their holdings
so that they accurately represent how they appeared in a certain
period, they should do so as carefully as possible. Their efforts
will educate future generations about the way things really were
in the past, not as we imagine they might have been. Sloppy,
inaccurate research can have far-reaching negative effects.
Individual home owners do not necessarily have to adhere
to the same standards as a historical society. We are all free
to just plain enjoy antiques and to fall in love with a chandelier
that looks every bit of its 200 years of age. Few of us are out
to educate the world or to accurately represent a certain period
within our homes; we ought to do what pleases us.
Antique Argand and solar chandeliers can easily cost sums
that run five or more figures. If you cannot find or afford an
antique fixture that suits your needs, an accurate reproduction
fixture just might. And that often leads to making a decision:
do you purchase a chandelier that has been artificially antiqued
or one that represents how the fixture would have looked as it
came out of a shop in the 1800s?
Which do you chose? When I compiled my first catalog twelve
years ago, I included a Forward that addressed this question:
Dear Friend
It was on my birthday many years ago that I first became aware
of tinware. My mother had given me an antique tin cream jug that
has since served as a utensil holder on our kitchen counter.
Made in the 1800s, over the years it has acquired some dents
and scratches and developed a beautiful patina – quite a
contrast to its bright, mirror-like finish when it was new.
I am sure that the old cream jug could tell quite a
story if it could relate all the history that was mirrored in
its once-bright surface. Perhaps it could tell of its purchase
by a young newlywed couple, trips to the creamery at a neighboring
farm, babies growing into young adults and eventually its new
residence in the home of one of their married children. The jug
had been passed on from generation to generation to become a
family heirloom.
My old cream jug marked the beginning of my appreciation
and reverence for period tinware and is, with little doubt, responsible
for my decision to offer my tinware with a bright, shiny surface
finish, the same as that of tinware our forefathers purchased
many years ago. Finished this way, mirroring your family’s
personal history, over time and with use your purchase will become
a family heirloom acquiring its own dents, scratches, and patina
to become an authentic antique in its own right.
It is my sincere hope and desire that you will enjoy
and use your purchase so that it can become to you and future
generations what today’s antiques were to our forefathers
and are to us today.
Twelve years later I still feel the same way. An artificially
antiqued reproduction will always be just that and no more. On
the other hand, a finely crafted reproduction will one day become
an authentic antique in its own right. Please do not misunderstand
my intent. I would not presume to think that you should agree
with me or that my thoughts are correct in all circumstances.
There really is no right or wrong answer and each individual
is blessed with the freedom to make his or her own choice.
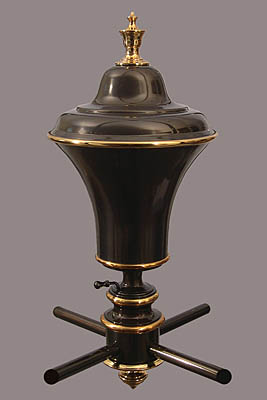
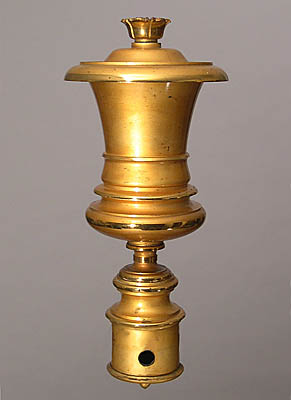
The photograph of the gold-colored font on the right
shows a circa 1850's Argand font which was part of a gas chandelier.
It is in pristine condition and is a fine example of the high-gloss
finishes that were popular in the period. Notice the bright reflective
appearance of the bright-banded areas. The photograph of the black
font on the left pictures a font which is part of an Argand 4-burner
chandelier. The chandelier is a reproduction that was made in
late 2005. Notice the similarity of the finishes of these two
lamps, - one that is only a few months old and the other that
is easily one-hundred and fifty years old.
|
|
|
Suggested Reading
Seale, William Recreating the Historic House Interior,
copyright 1979, The American Association for State and Local
History, 1400 Eighth Avenue, South, Nashville, Tennessee 37203,
ISBN 0-910050-32-5
- This is an excellent how-to book that explains in great
detail the various steps involved in a restoration project from
start to finish. This book is well worth reading whether you
are planning a highly accurate restoration or one that is not
researched and executed to the very high standards that are set
forth in the book. While there is little information that relates
specifically to Argand, solar, and sinumbra lighting, this book
can be of great value in helping to determine the appropriate
lighting fixtures that should be considered for a particular
restoration.

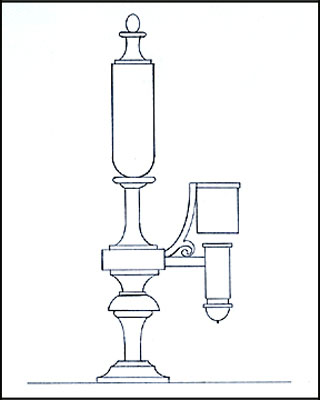
Original chandelier to be reproduced
 |
The degree of difficulty in making a reproduction is in
direct proportion to the complexity of the piece to be reproduced.
One of the first questions to consider when deciding whether
or not to reproduce a particular lighting fixture is "Will
it sell?" - but the very first question that I ask myself
is "Do I like it?" and if the answer is yes then I
survey a group of friends to get their reactions. While this
is not a terribly sophisticated market survey it has proven to
be quite successful. In the case of this 4-burner chandelier,
these questions were easy to answer and I did not consider conducting
a market survey - how could anyone not like it?
* * *
The lamp must be studied closely keeping several key things
in mind: first, how well does the fixture lend itself to being
electrified and second, how practical will it be to make it an
exact reproduction. Electrification issues revolve mainly around
how well the wires can be hidden from view, so all parts of the
fixture are examined from this perspective. In regard to the
practicality of making this chandelier an exact reproduction,
one main issue was immediately apparent. The canopy and the hooks
at the top and bottom of the support rods were rather heavily
carved and these castings were not of the highest quality. Even
if it were possible to get permission from the owner of the chandelier
to make molds from these parts it was likely that the resulting
castings would not pass inspection because successive generations
of molds and castings loose detail and dimension. So making an
exact reproduction was out of the question unless an artisan
was hired to carve the required pieces: it was determined that
the project would not likely bear this cost and most importantly
that substitute designs would easily blend in with the style
and design of the chandelier.
* * *
Photographs and precise measurements were taken of all
of the parts of the fixture. After this was done, everything
was double checked and an inventory taken to be sure that all
parts and all parts of each part had been photographed, sketched,
and measured; it can be expensive and sometimes impossible to
re-visit a fixture to obtain an overlooked detail or measurement.
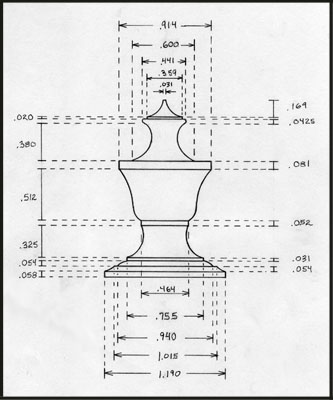
Detail photographs are taken from various angles
to show all of the detail of a part. Rough drawings are made and
precise dimensions are noted.
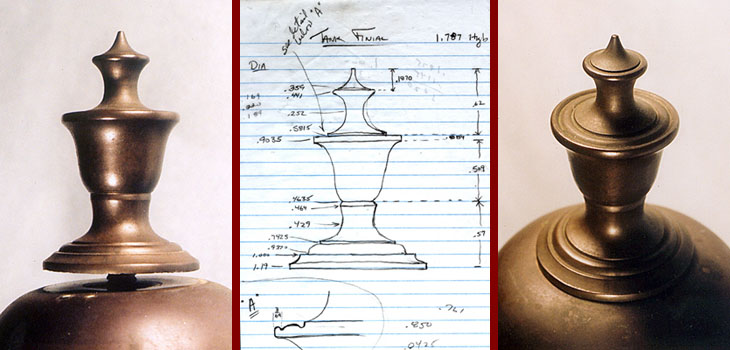 |
Final drawings are made using the photographs,
sketches, and dimensions. The drawing above is ready to be sent
to the machinist.
 |
* * *
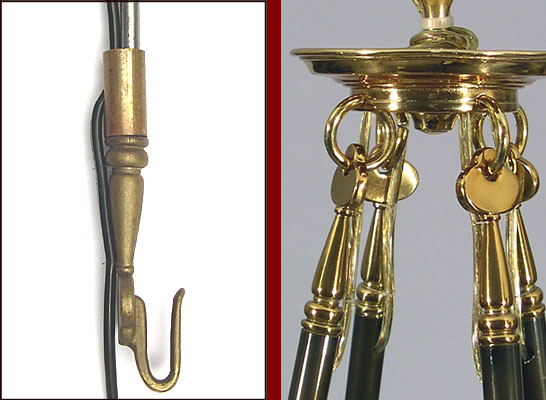
In the case of this chandelier it is quite easy to hide
the wires and where they are exposed the color of the insulation
will blend in well with the color of that part of the lamp with
which they come in contact. The photograph to the left shows
a cut-away section of a hook with a short piece of the brass
tubing. You will note that the steel rod that holds the assembly
together is screwed into a hole that is offset in the end of
the hook - this offset was necessary to make adequate room for
the wire within the tubing. The photograph to the right shows
the wires as they exit the tubing at the top of the rods and
extend up through the canopy.
 * * *
* * *
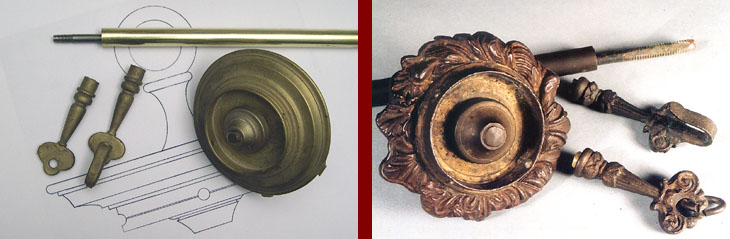
New designs were developed for the hooks and canopy while
taking into consideration the shapes and dimensions of the original
pieces and incorporating as much of the "feel" of them
as possible. The photograph to the left shows a drawing of the
new canopy and the rough castings of the new parts; the photograph
on the right shows the original canopy, hooks, and tubing with
the steel connecting rod.
 * * *
* * *
Toward the beginning of this whole process it was necessary
to work up the drawings and specifications and to make the graphite
template for an appropriate shade for the chandelier and to work
with the glassblower to help resolve the inevitable problems
that always seem to develop along the way.
Weeks were spent at the drafting table scaling and drawing
all of the various parts of the chandelier. After the drawings
were completed, specifications for the font were sent to the
spinner so that he could start work on the chucks or forms that
are required for the spinning process. A number of the parts
are cast and it was necessary to send the drawings for those
parts to the machinist so that one of each could be machined
and used as a model for casting. When these parts were finished
they were shipped to the casting house so that molds could be
made and the required number of each part cast. Drawings of all
parts to be machined were sent to the machinist so that he could
start working on them. Once all of the required parts were received
it was necessary to develop assembly procedures and make any
required jigs. After the assembly was finished, the chandelier
had to be disassembled and prepared for finishing. Various hangers
had to be made so that the parts could be held securely while
they were patinated and lacquered.
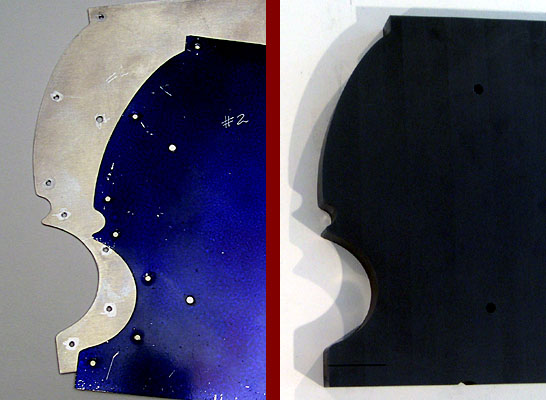
On the left are both a tinplate pattern and an
aluminum template that are used to cut the graphite template that
is pictured on the right. These are cut and finished by hand and
have been much more accurate than ones that had been cut by computer
operated machining equipment.
 |
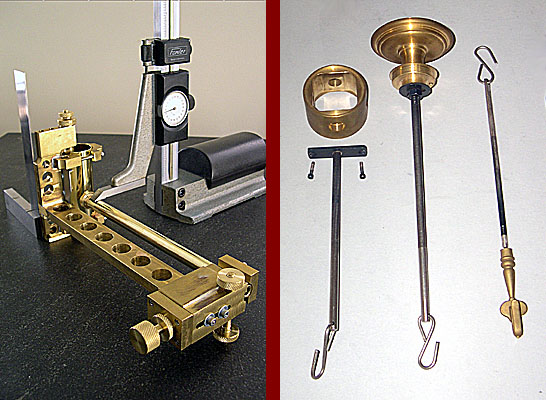
The jig in the photograph on the left was designed
and made so that the burner and oil feed tubes could be aligned
and held at exactly 90 degrees to each other for soldering. This
alignment is critical if all assemblies of the chandelier are
to be plumb when the chandelier is hung. The photograph on the
right shows some of the hangers made to be used to hold various
components for finishing.
 |
* * *
The original chandelier is pictured on the left and the
reproduction on the right. From start to finish this project
required more than four solid months of work and thousands of
dollars in development and parts cost. Was it all worth it? The
answer is a resounding "yes". Sales have been good
in the three years that this chandelier has been on the market
and perhaps most importantly, from a personal perspective, the
sense of satisfaction and accomplishment that has resulted is
indescribable.


The very design of all Argand lamps as well as all subsequent
variations requires the use of a chimney or some sort of contrivance
that increases the draft in the immediate vicinity of the flame.
This is readily apparent when a lamp is first lit with no chimney
in place - the feeble flame burns cleanly only at a very low
wick setting. As soon as the chimney is placed on the lamp the
wick can be adjusted so that the flame will burn cleanly and
with much greater intensity.
It is rather remarkable that two very significant discoveries
were made at, or nearly at, the same time. Certainly the invention
of Argand's lamp in 1780* was a huge leap forward in the advancement
of lighting technology but the invention of the chimney was of
equal importance as it greatly enhanced the operation of this
lamp. The first chimney was not made of glass but rather of metal;
the bottom of the chimney was placed a little less than an inch
above the top of the flame. This allowed the light from the flame
to shine forth from beneath the chimney (experiments have proven
that this is indeed what actually occurs).
In the book Brandy, Balloons, & Lamps - Ami Argand,
1750-1803 on page 21 there is a plate that, based on the description
of the metal chimney, shows several lighting fixtures utilizing
what appear to be these same metal chimneys.¹ Flint-glass
was able to withstand the sudden heat to which it was subjected
by the burner and thus the efficiency of the chimney could be
greatly improved since it was possible to reduce the diameter
of the flint-glass chimney so that it was not much greater than
the diameter of the wick.
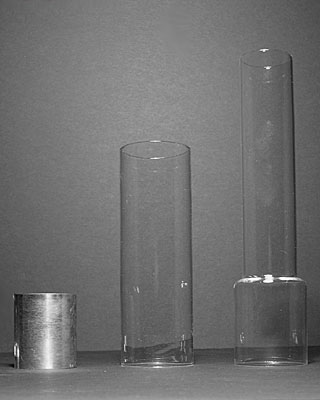
Chimneys developed in stages. As mentioned, the first chimney
was a short metal tube. The first glass chimneys were also cylindrical
in shape but longer in length. The extra length increased the
draft which resulted in a greater flow of air past the flame;
this caused the flame to burn with greater efficiency and thus
yielded a much higher level of illumination. The last main improvement
of the chimney had to do with its shape (see the chimney at far
right in the photograph below). An exert from An Encyclopedia
of Domestic Economy printed in 1845, describes this perfectly:
"In the original construction of Argand's lamp there
was an imperfection in the glass chimney, which has been removed
by subsequent improvements. The glass was at first made simply
cylindrical, and then the air within rose quite vertically between
it and the flame, striking upon [the flame] imperfectly; on which
account the lamps could burn only the best oil. But by a French
alteration of the shape of the glass, made some years ago, the
lamp burns with a clearer light. Instead of being of equal width
throughout, [the chimney] is contracted at the level of the flame,
by which the current of ascending air is made to turn out of
its course when it arrives at this shoulder, and is propelled
[inward] against the top of the flame just where the smoke is
beginning to part, which, in consequence, is destroyed almost
entirely."²
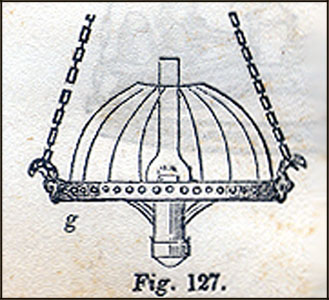
Shades, or globes, served a dual purpose but I believe
that the original intent was likely to have been to improve function
rather than style. Shades were made of various materials other
than glass; references in period publications are made to shades
constructed of metal, paper and cloth: "To reflect the light
down, a skeleton of wire, such as is used for bonnets, was raised
over them in a hemispherical form, and on that was fixed thin
silk, which being partly transparent, had a very pretty effect."³
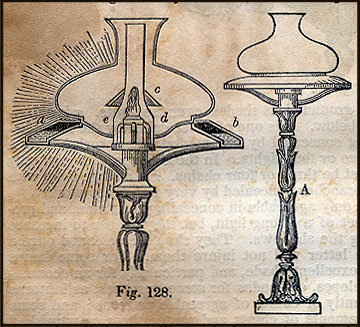
In this quote "…..the form of the ground glass
shade assists the dispersion of the rays of light [see figure
128]….."³ 'ground' refers to 'frosted'. Many period
paintings show people reading while seated at a table; the source
of illumination is often a lamp with a 'ground glass shade'.
Imagine the discomfort to the eyes while reading if a lamp had
no shade at all or if the shade, being fancy in style, was heavily
cut and polished. In both instances the reader would find the
bright rays of light to be most offensive.
- Period shades
came in many sizes and various profiles. Some were decorated
with cut and polished designs on a frosted surface while others
were simply frosted on either the inside or outside surface.
The cut and polished shades gave off a light that tended to be
bright and harsh and, while they might be considered to be elegant
in appearance, they can be very impractical because of the considerable
degree of glare that radiates through the cut and polished areas.
Some French shades were cut but not polished on the outside surface
and frosted on the inside; this resulted in a shade that gave
off a soft, warm glow when the lamp was burning and that was
also decorative when the lamp was not lit. Edgar Allen Poe did
not mince words regarding the subject of lighting and cut-glass
shades. The following is a quotation from his essay entitled
The Philosophy of Furniture:
-
- * * *
-
- THE PHILOSOPHY OF FURNITURE.
- Edgar Allan Poe
- Quoted, in part, from Burton's
Gentleman's Magazine, May, 1840;
Broadway Journal, I., 18.
-
- "In the internal decoration of their residences…
the English are supreme. The Italians have little sentiment beyond
marbles and colours. In Spain they are all curtains - a nation
of hangmen. The Russians do not furnish… The Yankees alone
are preposterous."
"How this happens, it is not difficult to see. We have no
aristocracy of blood, and having therefore as a natural, and
indeed as an inevitable thing, fashioned for ourselves an aristocracy
of dollars, the display of wealth has here to take the place
and perform the office of the heraldic display in monarchical
countries. By a transition readily understood, and which might
have been as readily foreseen, we have been brought to merge
in simple show our notions of taste itself."
"Glare is a leading error in the philosophy of American
household decoration. We are violently enamoured of gas and of
glass. The former is totally inadmissible within doors. Its harsh
and unsteady light offends. No one having both brains and eyes
will use it. A mild, or what artists term a cool light, with
its consequent warm shadows, will do wonders for even an ill-furnished
apartment. Never was a more lovely thought than that of the astral
lamp. We mean, of course, the astral lamp proper - the lamp of
Argand, with its original plain ground-glass shade, and its tempered
and uniform moonlight rays. The cut-glass shade is a weak invention
of the enemy. The eagerness with which we have adopted it, partly
on account of its flashiness, but principally on account of its
greater cost, is a good commentary on the proposition with which
we began. It is not too much to say, that the deliberate employer
of a cut-glass shade, is either radically deficient in taste,
or blindly subservient to the caprices of fashion. The light
proceeding from one of these gaudy abominations is unequal, broken,
and painful. It alone is sufficient to mar a world of good effect
in the furniture subjected to its influence. Female loveliness,
in especial, is more than one-half disenchanted beneath its evil
eye."
-
-
- * John J. Wolfe, Brandy, Balloons, and Lamps - Ami
Argand, 1750-1803, (1999): page 3.
-
- 1 - The plate is dated 1784, the same year that the first
practical glass chimney was made using flint-glass; it is therefore
possible that the chimneys depicted in the plate are made of
glass.
2 - Thomas Webster, An Encyclopedia of Domestic Economy,
(1845); Book IV, Artificial Illumination: page 180.
3 - Webster: page 182.
|

The scope of this reference list is rather specific and
limited to information regarding Argand, solar, and sinumbra
lighting fixtures as well as related topics such as (but not
limited to) wicks and fuels, chimneys and shades, finishes, ceiling
hooks and rods and mechanisms used to raise and lower chandeliers,
and manufacturers. Your contributions to this list will be welcome
– the greater the participation, the more valuable this
reference tool will become. If you are familiar with any books
or magazine articles that you would like to recommend, please
forward the information to me. If specific pages of a book or
magazine are pertinent, please be sure to list them. Also, it
would be helpful if you would include a brief description or
review of the material. Much can be learned from period paintings
and advertisements that picture Argand, solar, and sinumbra lighting
fixtures and we would appreciate any references to these as well.
Seale, William Recreating the Historic House Interior,
copyright 1979, The American Association for State and Local
History, 1400 Eighth Avenue, South, Nashville, Tennessee 37203,
ISBN 0-910050-32-5
- This is an excellent how-to book that explains in great
detail the various steps involved in a restoration project from
start to finish. This book is well worth reading whether you
are planning a highly accurate restoration or one that is not
researched and executed to the very high standards that are set
forth in the book. While there is little information that relates
specifically to Argand, solar, and sinumbra lighting, this book
can be of great value in helping to determine the appropriate
lighting fixtures that should be considered for a particular
restoration.
-
Gowitt, Gerald T. 19th Century Elegant Lighting,
copyright 2002, published by Schiffer Publishing Ltd., 4880 Lower
Valley Road, Atglen, PA 19310 610-593-1777, ISBN: 0-7643-1514-5
- This is a coffee table picture book that is loaded with
photographs of Argand, sinumbra, and solar lamps. Partial and
full catalog reprints include such period manufacturers as Henry
N. Hooper & Co., Starr Fellows and Company, and Dietz &
Company. This book is a must for anyone who is interested in
this type of lighting. Critic’s biggest objection to the
book is that the shades pictured on some of the lamps are neither
period nor proper for a specific lamp; I do not think that this
should dissuade one from purchasing this book as its qualities
far outweigh its weaknesses.
Wolfe, John J. Brandy, Balloons, and Lamps, copyright
1999 by the Board of Trustees, Southern University Press
- This is an excellent book about the life of Ami Argand,
the Genevese scientist who invented the central draft burner
that revolutionized lighting technology in the late 1700s. The
book is illustrated with 62 color plates of early Argand lamps
and 106 black and white illustrations. While the text covers
some of Argand’s work with hot-air balloons and the distillation
of wine, the bulk of the 192 pages are devoted to the development
of the lamps. This book has been out of print for several years.
This is another must for your library. I have a few copies that
are available for sale.
Chinnici, Curt R. “The Manufacture of Argand Lamps
in Philadelphia”, The Magazine Antiques, February
2002, page 62
- This is a history of the lamp manufacturer Cornelius &
Company and is illustrated with many fine photographs.
Carpentier, Donald G. and Sprigg, June “Like the Sun,
Like the Stars – Argand Lamps”, Early American
Life, June 1995, page 56
- This is a well written article about Argand, solar, and
sinumbra lamps that is illustrated with numerous photographs
of each of these forms of lighting.
Plescia, Vincent D. “Successful Innovations in Domestic
Oil Lighting, 1784-1859”, The Magazine Antiques,
December 2005, page 92
- This is a very interesting article that is illustrated
with a number of photographs and plates. While all three forms
of lamps are covered, sinumbra lamps are covered in greater detail.
Cooke, Lawrence S. Lighting in America - From Colonial
Rushlights to Victorian Chandeliers, copyright 1975,
published by The Main Street Press, 381 Park Avenue South, New
York City, NY 10016, ISBN 0-87663-253-3
- This is a compilation of articles exactly as they appeared
in numerous issues of The Magazine Antiques. The text
is illustrated with numerous photographs and while this book
covers quite a broad range of lighting there is information specific
to Argand, solar, and sinumbra lighting.
Country House Lighting, Temple Newsam Country House
Studies Number 4, copyright by Leeds City Art Galleries and
Jessica Rutherford, ISBN 0-901981-51-6
- This is a fascinating book that is a must read. The contents
include Lighting in the Country House, Four Centuries of Lighting
at Temple Newsam, Lighting in the Royal Pavilion at Brighton,
Candle Lighting, Oil Lamps, Gas Lighting, The Rise of Electricity,
and Furniture and Lighting. A bit difficult to find and not inexpensive
but I do not think you will be disappointed.
Bourne, Jonathan and Vanessa Brett, Lighting in the
Domestic Interior - Renaissance to Art Nouveau,
copyright 1991, published for Sotheby's Publications by Philip
Wilson Publishers Limited, 26 Litchfield Street, London WC2H9NJ,
ISBN 0-85667-397-8
- My comments here are ditto to those for Country House
Lighting. Copiously illustrated with photographs of lamps
and, most importantly, photographs of period paintings which
can be invaluable resources for information that has not been
distorted by later day interpretation. Another expensive book
but well worth the cost.
Dillon, Maureen Artificial Sunshine, copyright 2002
Maureen Dillon, National Trust Enterprises Ltd., 36 Queen Anne's
Gate, London SW1H 9AS, ISBN 0-7078-0288-1
- A social history of domestic lighting, this book is illustrated
with many high quality photographs. Chapter titles are: Fire
and Firelight, Rushlights and Tallows, Wax Candles, Lighting
by Oil, Lighting by Gas, and Lighting by Electricity. Obviously
written from the English perspective this is an interesting book
and while it is one of many that seem to cover the same subjects,
this one, as do others, sets forth some new tidbits of information
that are not only interesting by themselves but also help tie
everything else together.
Webster, Thomas An Encyclopedia of Domestic Economy,
published in 1845, Harper & Brothers, No. 82 Cliff Street
- This publication has an excellent 66 page section titled
"Artificial Illumination" that should be of value to
anyone who is interested in lighting. The complete volume was
also printed and distributed in twelve sections. This work is
fairly rare and pricy but the section noted above is available
at a reasonable cost - you can check for details by clicking
on the photo of the title page from the book that is pictured
with the reproduction lamp photographs above.
-
History of Lamps and Lighting, the Rushlight Archives:
1934-2006, copyright 2007, published by the Rushlight Club,
Dan Mattausch Project Editor.
- This DVD is a compilation of The Rushlight, a quarterly
publication of the Rushlight Club; the club’s intention
is to periodically update the DVD for a nominal fee on a disk
exchange basis. The DVD is perhaps the most inclusive reference
that covers all types of lighting that can be researched by article
author, subject, date, or page number. For example, all articles
that contain the word Argand, sinumbra, and solar can be brought
up by entering any of this words in the “Search” box.
People with an interest in solar lighting will find three highly
detailed and copiously illustrated articles written by Ursula
and Heinz Baumann that deal with the construction of early American
solar lamps. This DVD is user friendly and highly recommended.
The only fault, if you can call it that, is that you are likely
to find yourself spending more time than ever in front of your
computer screen.

Early Argand lamp manufacturers had to concern themselves
with a wide range of crafts. These included tinsmithing, machining,
spinning, casting, and finishing. And since the design of the
Argand, sinumbra, and solar lamps requires chimneys and or shades
for proper function, manufacturers had to find sources for the
glassware as well. So, it was necessary for manufactures of the
period to either hire a work force that was comprised of artisans
who represented the various necessary crafts or to out-source
the work that they could not do, or that was found impractical
to do, themselves.
What was true in the 1800's is still true today. While
JP-Tinsmith has expanded its in-house 'manufacturing' capabilities,
the work of certain artisans is out-sourced. From the onset,
it was obvious that in order to get this business off the ground
the services of a highly skilled and dependable glassblower would
be required. Such a person, whose business is located in New
Hampshire, was found purely by accident. He is a true craftsman
in all senses of the word, dependable, reliable, and has been
a most valuable asset to the business. Spinning and casting work
is out-sourced as well and once again we have been most fortunate
to have found artisans that are tops in their respective fields.
They, too, have been a pleasure to deal with and have supplied
spun and cast parts that are consistently of the highest quality.
Over time I have become aware of the fact that many people
are curious about these various crafts and so this section of
the site has been developed to give a brief pictorial introduction
to the crafts mentioned above. Purists might complain that modern
equipment that is used today was not available in the early 1800's.
While that is true, keep in mind that the basic design and tasks
preformed by the tools and machines that were used in the period
have not changed drastically, if at all, to this day. Like all
artisans throughout time, craftsmen in the 18th and 19th centuries
took advantage off new technology as it became available. For
example, 19th century tinsmiths took advantage of and used newly
invented rotary machines that enabled them to make tinware at
a much faster rate than 18th century tinsmiths who had no such
machines with which to work. It was essential for their survival
that they take advantage of new technology so that they could
remain competitive. This simple economic principle is no different
today than it has been throughout the ages.
Here at JP-Tinsmith our selection of tools spans a period
of time from the early 1800's to the late 1900's. The craft of
tinsmithing changed quite a bit in the late 1800's and over time
tinsmiths turned to roofing and heating, air conditioning, and
ventilation duct work. Because the time period of the tinsmithing
work that is done here in the shop is that which extends to just
past the first half of the 19th century, many of our tinsmithing
tools date back to that same period. The ages of our machining
tools are a different story as they date from the middle 1930's
to the late 1900's. And while this machinery may seem to be fairly
advanced when compared to that used in the early 1800's, by today's
standards it is considered to be very much out-dated and obsolete
because CNC (computer numerically controlled) technology has
since been applied to the machine tool industry.

The basic equipment used by a machinist is the lathe and
milling machine. Using both of these machines, a skilled craftsman
can make a wide variety of objects. The photographs below show
a lathe, a milling machine, a gusset and an Argand chimney/shade
holder, and the tooling used and steps taken to machine these
parts.
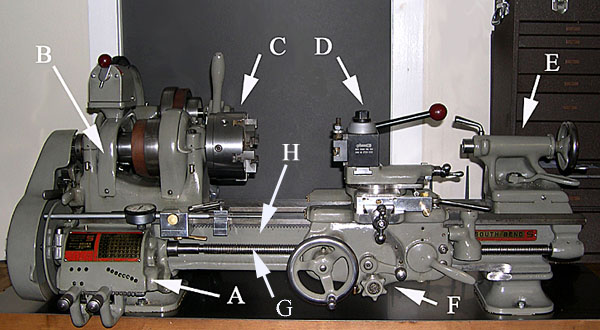
First let's identify the various parts of the lathe: A is the gearbox, B is the headstock, C
is the chuck, D is the tool post,
E is the tailstock, and F is the carriage. The lathe pictured in
this photograph is a South Bend Model C that was made in 1937.
It was the most basic model available but by the addition of
the gearbox and a different carriage, it has been converted to
a Model A which provides faster gear ratio changes and powered
cross feed (in-out motion) of the tool post. The headstock is
mounted and fixed in one place. A rear mounted motor drives the
shaft in the headstock by means of a flat leather belt. The purpose
of the chuck, which is mounted on the revolving shaft, is to
hold the work piece that is to be machined. The tool post holds
the various cutting tools that are used to shape the work piece.
The tailstock is used to hold and support the opposite end of
the work piece so that it will rotate true and not wobble; this
is not needed when the work piece is short in length. Unlike
the headstock, the tailstock is not stationary and can be slide
back and forth along the length of the bed H.
The tailstock is also used to hold some tooling such as a drill
bit that would be used to drill a hole through the center of
the work piece. The gearbox allows for different speed settings
of the long screw G that runs the
length of the lathe and through the carriage - through gearing
within the carriage this screw moves the carriage back and forth
and the tool post in and out. The tool post is mounted on the
carriage and the key to the operation of the lathe is that the
cutting tool that is mounted on the tool post can be moved from
one end of the lathe to the other and also in an inward and outward
direction.. These motions can be controlled to within one one-thousandth
of an inch and this high degree of accuracy allows a machinist
to machine an amazing array of objects that are uniform in shape
and size.

The milling machine is pictured in the photograph above,
left. It is a Prazi II Apollo Series high precision German made
machine that was purchased in 1996. It differs from the lathe
in that the work is held stationary in a holder mounted on the
table I and the cutting tool, held
by the spindle C, rotates. Material
is removed by moving the work piece past the revolving cutting
tool; the table which is moved either from left to right by turning
the hand wheel G or in and out
by turning the hand wheel H. A is a rotary index table and B is a chuck. The work piece is held in
the chuck and can be rotated for certain milling operations by
turning the hand wheel on the rotary index table. The milling
head, D, can be raised or lowered
by turning the hand wheel E. F is a digital readout or DRO. This is
an electrical device that is connected to sensors that are attached
to the three motions (left to right, in and out, up and down)
of the milling machine. Motion in any of these directions is
registered on the screen of the DRO and allows for machining
accuracy to within 5 ten-thousands of an inch. As with the lathe,
the movement of the various parts of the milling machine will
allow the operator to machine a wide variety of parts.
The photograph above on the right pictures a gusset and
a chimney/shade holder. The machines, tools, and processes used
to make these two pieces are shown below.
GUSSET
Both the lathe and the mill are used to make the gusset.
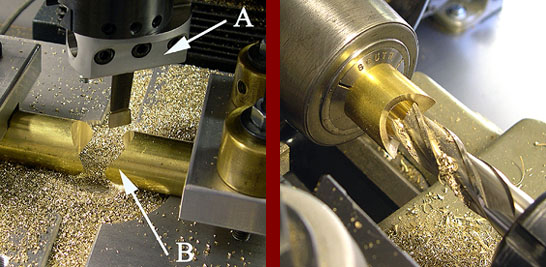
The first operation is done using the mill (above, left) in which
the curved part of the gusset that mates with the vertical burner
tube must be machined . It is critical that the curvature of
the gusset B perfectly matches
the curvature of the burner tube. Two pieces of solid round brass
rod are held in a special jig that is secured to the mill table
and in this way two pieces can be machined at the same time.
The cutting tool is held in an adjustable boring head A - as the tool spins it is lowered down
through the work pieces so that it will make a cut the full depth
of the work in much the same fashion as a hole is drilled. Because
it is impossible to bore the hole to the finished diameter in
one pass, this must be done in small steps by adjusting the boring
head so that the cutting tool makes a cut with a slightly larger
diameter with each successive pass.
In the second operation (above, right) the work piece is
mounted in a chuck on the lathe and a hole is being milled or
drilled through the center using a cutting tool held in a chuck
in the tailstock.. In this operation, the gusset rotates and
the cutting tool remains stationary.
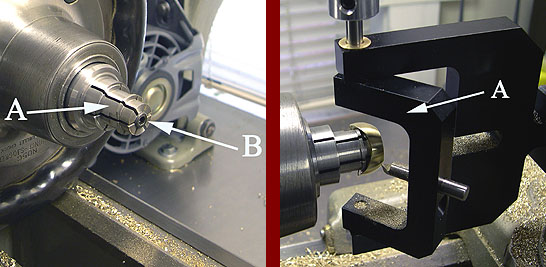
Once the hole is drilled in the gusset it is necessary
to hold the gusset so that the outside of it can be machined
to look like the finished gusset in the photograph. This is done
by using what is called an expanding collet (above, left). An
expanding collet is a work holder that is cylindrical in shape.
The end is slit in six places and the diameter is just barely
smaller than the diameter of the hole in the gusset. The head
of screw B is tapered so that when
it is screwed in, the taper on the screw forces the six segments
A in an outward direction. So,
when the gusset is slipped on to the end of the expandable collet
and the screw is tightened, the six segments expand outwards
and grip the gusset with a considerable amount of force. The
gusset is now held securely so that the outer surface can be
shaped.
A radius cutting tool (above, right) is used to shape the
surface of the gusset. A swinging motion of part A
of the radius cutting tool rotates the cutting tool around the
gusset in a horizontal plane and thereby machines the curved
outer surface.
ARGAND CHIMNEY/SHADE HOLDER
This is the disc shaped part of the chimney/holder assembly
upon which the chimney and shade rest. The chimney rests on the
inner walled surface and the fitter of the shade rests on the
surface between the two walls. The slots in the chimney section
allow for the free passage of air that is needed for complete
combustion of the oil and the slots in the outer ring allow for
passage of air that helps to keep the shade relatively cool.
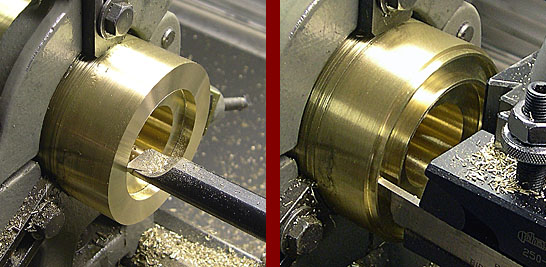
The first operations are preformed on the lathe. In the
photo left, above a smaller center hole has already been bored
to the appropriate diameter so that the holder can fit down over
the burner tube. The large recessed area that has just been bored
with a tool called a boring bar is the area in which the chimney
will rest.
In the photo above, right the area that supports the shade
is being machined. This photo shows all of the lathe work that
is necessary to shape the contours needed to hold the chimney
and shade.
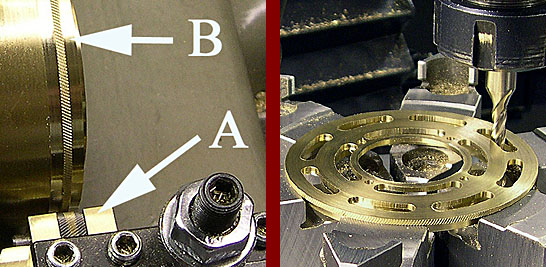
A tool called a knurler A is
used to knurl the surface of the outer edge of the holder. Since
the chimney/shade holder is rotated to raise and lower the wick,
the knurled edge helps prevent the fingers from slipping while
grasping and turning the holder. By advancing the tool post toward
the back of the lathe, a considerable amount of pressure is exerted
on the knurling wheel as it comes in contact with the outer edge
of the chimney/shade holder; this causes the knurl to imprint
its striated lines B on to the
part. The lathe work is now completed and the next operation,
not pictured, is to cut off the finished part from the long brass
piece held by the chuck; it is cut off just to the left of the
knurled area.
The last photo shows the holder held by the chuck on the
rotary index table. A cutter called an end mill is used to cut
the two rings of slots. The rotary index table is graduated in
degrees, minutes, and seconds and this allows for very precise
location of the beginning and ending points for milling each
slot. To cut a slot, the table is rotated to the starting point,
the spinning end mill is lowered into the work and the table
is then rotated to the end point of the slot where the end mill
is raised out of the work; the process is repeated until all
of the slots have been milled.
Not shown is the last step which requires filing the 48
corners of the 12 slots. While this is not necessary for the
function of the part, it must be done because the corners on
all of the period holders that I have seen have been squared.
It is interesting to note that the corners on at least some of
the cast solar shade holders are rounded as seen on the holder
in the above photograph.
 Work on this topic is in progress - please check
back soon.
Work on this topic is in progress - please check
back soon.

Below follows a pictorial and written description of the
glassblowing process that we use to reproduce the Argand, sinumbra,
and solar shades and chimneys. Early shades were blown in molds;
our shades are blown by a scientific glassblower using a glassblowing
lathe. While ones first impression is that the process that we
employ is very different, upon closer inspection it is realized
that it is actually very similar. This process allows us to accurately
and repeatedly reproduce the profile and fitter sizes of shades
and chimneys.
* * *
Solar Shade
 |
-
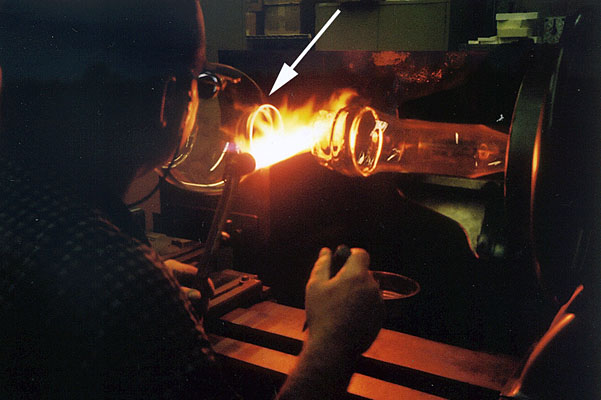
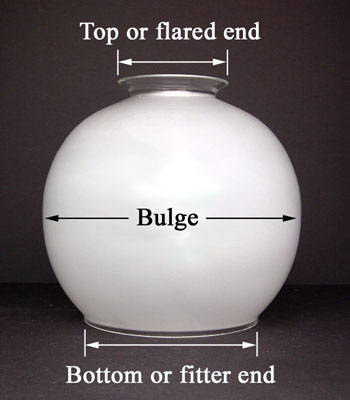
- The four photographs below show the basic processes involved
in blowing and finishing a solar shade. In these photographs,
the top or flared end of the shade is pointing toward the right
side of the photograph and the bottom or fitter end of the shade
is pointing toward the left side.
-
- This photograph shows the glassblowing lathe and the graphite
pattern "A" that is mounted on the lathe. The graphite
pattern is machined to the exact profile as that of the shade.
The glass is heated and blown until the glass just barely touches
the full length of the graphite pattern and therefore the shape
of the finished shade will exactly match the shape of the pattern.
The lathe consists of four main parts; the headstock "B",
the carriage "C", the tailstock "D", the
bed "E", and the chucks "F" . The first three
pieces are mounted on the bed of the lathe. The bed is a rigid,
accurately machined piece of cast iron that keeps the other three
components in constant and exact alignment to each other. On
a glassblowing lathe, the chucks that are mounted on the headstock
and the tailstock both rotate (chucks are vise-like fixtures
that hold the glass). The headstock, on the left side of the
lathe, is stationary and is connected to a piece of flexible
tubing through which the glassblower blows in order to expand
and shape the glass. The tailstock, on the right side of the
lathe, is not fixed in a single position and can be moved to
the left or right. In this photo, you can see a piece of glass
tubing in the headstock (this will become the bulge portion of
the shade) and a smaller piece of tubing mounted on the tailstock
(this will be the top, flared part of the shade). The first operation
will involve heating and shaping the ends of these two pieces
of tubing so that they can be fused together to form a single
piece.
-
-
-
-
- Next the glassblower will heat and blow the shade. Note
the tubing (arrow) in his mouth; this is attached to the headstock
of the lathe and extends into the interior of the glass tubing
so that when the glassblower blows into the flexible tubing,
the hot, molten glass will expand outward until it just touches
the graphite pattern. In this photograph, the bulge and flair
have been completely formed.
-
-
-
-
-
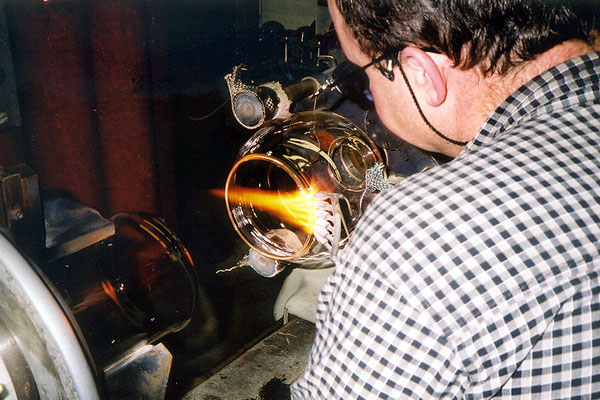
- Now the glassblower is concentrating a narrow, intense
flame on the portion of the shade just above the top of the flair
(arrow). When the glass is hot enough, the glassblower will move
the tailstock toward the right end of the lathe - this motion
pulls on the glass tubing that is held by the tailstock and separates
it from the shade just to the right of the flair. Later, the
top of the flair will be ground to the exact dimension.
-
-
-
- Once the shade has been blown to the final shape and the
excess tubing at the top of the shade has been removed, it is
necessary to cut off the excess tubing at the bottom, or fitter
end, of the shade. In this operation, done on a different lathe,
the bulge of the shade is gripped by a special chuck mounted
on the tailstock and the fitter portion of the shade is gripped
by a chuck on the headstock. Again, a special torch that concentrates
the heat in a narrow band is used to heat the glass at the bottom
of the shade and once the proper glass temperature has been reached,
the tailstock is moved to the right to separate the completed
shade from the glass tubing at the fitter end.
-
- The fitter will be ground to the proper length and then
the ground surfaces of both the fitter and the top of the flair
will be fire-polished. This process requires reheating the glass
so that it becomes fluid and glazes over; this results in a surface
finish that is clear and smooth and also helps to prevent chipping
in these two vulnerable areas.
-
- Frosting the shade is the last process and this is done
using a sandblaster that is powered with compressed air. As was
the case with period shades, our reproductions are frosted on
either the inside or outside surface.
-
-
 Work on this topic is in progress - please check
back soon.
Work on this topic is in progress - please check
back soon.
 Work on this topic is in progress - please check
back soon.
Work on this topic is in progress - please check
back soon.
|